Monday, April 25, 2016

Stamp Carving 101 Vol. 3

Wow it's been a awhile. I'm still learning this sharing stuff. I'm trying to remember to keep my blog up to date but it's hard sometimes. However I wanted to take this time to share with you all what seems to be my "it" craft. I'm currently into a major stamp carving craze. 

This past weekend we hosted a "kaarve fest" at the Kraafters Kommunity on Google plus. It's a great place where you can find lots of supportive, generous and crafty artistic folks always willing to help and share their talents. Our fest was a Saturday live event in which we gathered our supplies and carved stamps right from the comfort of our homes and connected via our web cameras. 
So here are some of the stamps I worked on. 

Two rose stamps and a heart to add to my creations.

A funky fish. I saw some cool fish stamps on Pinterest and decided to create my own.


I created some eyes I had been wanting something like this for my mail art and now I have it. 

I then stamped all my stamps on to a paper that had some clean up paint. I managed to create some cool art. Oh,
the possibilities are endless. 
 
I had so much fun that day that it continued for an extended weekend.  Sunday carving resulted in a mason jar and some doodle flowers and leaf.

I then pulled out all my flower stamps and created a jar full of flowers. 


Then while checking my Instagram on Monday, I came across a post that had me carving some more flowers for my jar. 


I think I'll be carving things to add to my jar for a while... Carve fest ain't over until the scraps are used! 


Thursday, March 10, 2016

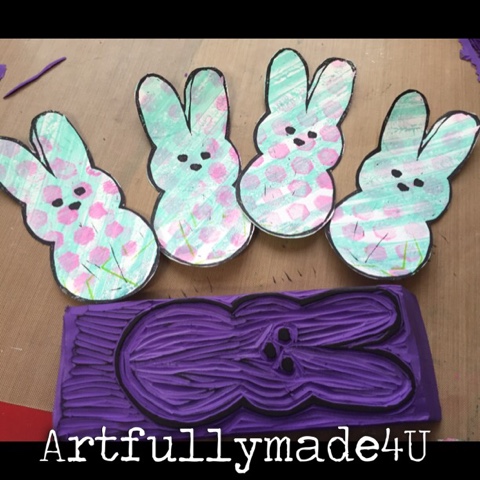
Stamp Carving 101... Vol. 2

Oh my, it's been a while. I've neglected my blog. Life and health issues got the best of me, and it's taken me a while to find my way back to sharing my creations. I've started the new year with a fun new venture. I added some of my work on society6; it's a fun site that allows "artists" like myself to offer prints and other fun goodies. It has been so much fun seeing my art turn into bags, mugs, totes and more. That has helped keep me art active. I also have the honor of knowing some wonderful people from the Kraafters Kommunity that help feed my art soul with lots if inspiration and play time. In our most recent hangout, we carved some stamps. I had a blast. It had been a while since I busted out my carving tools and had forgotten how relaxing and addicting it is.

For my play time, I used some giant erasers from Dollar Tree. I really like using these because of the thickness and firmness. The price isn't half bad either. You can easily carve both sides of the eraser and get two fairly large stamps for a buck. I'm not worried about it lasting forever. Chances are by the time it falls apart on me, I'll be ready to carve a new one. 
I'm preparation for my play date, I went to Pinterest and got lost looking at all the fun stamps. I settled on a feather, dandelion, seed, and a peeps bunny. 

Feather: 


Dandelion seeds:


Peeps bunny: 


Bonus: During February, I created a Snoopy stamp to use for some Valentine's Day postcards. I thought I'd share it here as well. 


Thank you so much for stopping by.


Wednesday, December 23, 2015

My Peanuts Obsession... Christmas cards

After lots of web surfing, I finally settled on a design for my Christmas cards. Since this time is Peanuts overload time for me, it's natural that I make cards with that theme in mind. So for my cards, I used a cookie platter that I had seen. It was a set of round cookies that were decorated to represent each of the Peanuts gang characters through their outfit. So I incorporated that idea, but on some ornaments. 
The first step was to create an ornament template. I did this using a free image from Google. I printed it onto 110 cardstock.  I then used some alcohol markers to color the ornaments in. I drew the shirt design as I was coloring each one. I also use this as a way to practice my shading. I need to revisit that some other time. 
Once I had my ornaments colored, I cut them out. Yes, by hand...every single one. You cannot say that these were not made with love. 

I then moved on to giving them a bit of "wow." I did this by using dimensional Magic. This gives them a glossy top coat that had a slight raise to it. I used a silver maker for the top of my ornaments. However I felt it still needed more. I went over it with some glitter glue. That gave it just the right amount of shimmer.
While my ornaments dried, I worked on my card base. I used recollections 110 black cardstock. This is beautifully, thick cardstock that works wonders for card bases. When I showed my husband the sheets, or colored ornaments, he had a puzzled look. He didn't understand what they were suppose to be. I kinda of figured it would be so easy to distinguish. I never considered that some folks might need a little hint. So for that, I used some comic strips from my desk calendar. This helps clue you in on what the theme is, just in case you're not Peanuts obsessed.  I added two silver lines to help me place my ornaments. 
Once the ornaments were dry, I added some foam tape and a silver bow made of sewing thread. I had played around with wider ribbon but it was too much and it competed with my ornaments. I really wanted them to be the main attraction. So I used the thin sewing thread.
With all my pieces ready to assemble, I was able to get my cards done pretty quickly. I'm not a card maker, so I have so much respect for those that make them regularly. 
I love the way they turned out. Maybe next year, I'll get them done before Christmas. 
For the inside greeting, we went with "Happy Holidays from our gang to yours!" and "Merry Christmas from our gang to yours!" The greeting was based on how late we were to mailing them out. In case they didn't make in time for Christmas, they'd be in time for the new year. 
Thank you so much for checking out these fun cards. I was so in love with them, it was hard to let them go. But I know they will be enjoyed. 


Tuesday, December 15, 2015

My Peanuts Obsession... It's Christmas Time

Wow, it's been a awhile since I've been able to blog. Life has been a bit crazy with my health throwing me for a loop.  My creative endeavors have been far and few between.  I've tried to listen to my body and allow it time to heal. However, it's my all-time favorite time of the year and  that means one thing in my house ...It's Peanuts Time! 
It's hard to pinpoint when my Peanuts obsession began. I didn't grow up with the comic strip. My Sunday comics consisted of Dennis the Menace and Family Circle. It wasn't until I was an adult that the Peanuts comics started to feel very relatable. Sometime in  late 2000, I walked into Target and fell in love with the Kurt Adler ornaments they sold. I picked up 1 or two. The following year a few more.  Around 2002 my husband bought me my first hallmark ornament. It was love at first sight! It started with about 4 ornaments. When I discovered that Halmark carried a whole series each year, I thought it would be fun to get them all the following year. That is pretty much how my obsession was kicked into high gear. I soon found myself on eBay trying to find rare collectible ornaments.  It was a bit overwhelming, so I focused on meaningful years, birth year, and milestone years. My collection started with the ornaments then I started collecting anything Peanuts Christmas-themed. It was my controlled obsession. I had it under control.  Then suddenly, with out even realizing it, non Christmas items started joining my collection. It was then that I realized that things had gotten a tad out of control...more on that on a later post. 
For now, I'd like to share with you all the madness that is my Peanuts Christmas tree 2015.

9ft tree 

Close up 
Close up left side.
Top of tree. 
Close up right side.


As money has gotten tighter, I've had to be very selective as what I want to add. This year my wish list was greater than my budget. 

My wish list: 


Nesting dolls and salt and pepper shakers... Oh my! 
Sweet reindeer Snoopy.
Dancing Snoopy! What?! 


A few pictures on the previous years. You can see how my collection has slowly grown. I no longer use filler ornaments. 

2011 tree.

2012 tree. 


2001 tree. 

2000 tree it's humble beginnings.

Thanks for reading! Do you collect anything? I'd love to hear all about it. 


Saturday, September 5, 2015

Let's get scrappy! Kill the kit edition

Spark some Kreativity Saturday @ The Kraaft Shaak


It is hard to believe that we are already at the end of the second round of The Kraaft Shaak's design team projects.  We have had so many amazing project shares that it's hard to see it come to an end. Although it is the last month of design team projects, it is by no means the end of the Kreative Sparks. 

So it is only fitting to say our goodbyes to this round of designers with a fun challenge.  We will attempt to "Kill our Kits" with a  home decor project which, in all honesty, is very hard almost impossible. 

I decided to use an old box as my base. Since I was going to be covering it with all my left over text pages, I didn't care for a fancy canvas. But any base will do. The box that I chose had a plastic coating on it, so I peeled that layer off so that my papers would stick and not flake off.


Once I had my base ready I cut my text pages in half and glued them down with some mod podge.


I wanted to keep  as much of the pages without glue on top as possible, since untreated pages react differently to paint. Once I was happy with my base, I went for some color. Since I was trying very hard to use mainly products from the kit I used my prima chalk paint in olive


My initial reaction was "what in the world did I get myself into?" This is not a color I would tend to use. Well correction...I love the color, but on my walls, not my art.  Since I was not loving it as is, I added some prima chalk paint in golden yellow. This was from my previous kit. The paint samples you get are hefty. There's a whole lot of paint in those little tubs. 


Adding the yellow made me a bit more comfortable with the color pallet. Once everything was dry, I added a few more text pages to give the background some more interest. 


The different sizes of the text made for a more interesting background. Once these pages were glued down, I wanted to add some variation to my green. So, I used my portfolio pastels in greens to add some color to them. 


This gave my back ground a bit of contrast. My kit came with a heart doilie, and I also had a smaller one from my stash. I loved the design on them and decided to use them as my stencils.


I used some coral paint to sponge over the doilie and then randomly stamp it on my back ground. I repeated this process with the small and large hearts.  The color seemed too dark. Then, I remembered I also had a sample of the prima chalk pain in pink. Once that color went on, I was suddenly in love.


An added bonus was the colored doiles I had after this step. 


Romantic is not unusually a style I work with. The light pastel color pallet is beautiful, but so hard for me. I tend to go for bright happy colors that make you want to jump up and dance. Another item that I don't use much is shimmer. So what better time to use it than with a challenge. I mixed some green mica powder and 3D gloss  gel.


And used my doilie as a stencil.


I have to say that these doiles are sturdy. They worked great as a quick stencil. It added some fun texture to my project. 


I had a background that I was fairly happy with and trying to decide what to do next was not easy. Since this project was already all about firsts for me, I decided to continue on that path and  use the napkin that was in my kit. I have never used a napkin in my art. I've seen it done lots of times, so I decided to give it a go. The kit came with a floral napkin with some butterflies. I cut my images out and used mod podge to glue them down. It only took a second for me to realize why people use these all the time.


It instantly transforms your project. I have a whole new respect for napkins in art. Once this was down, I was ready to call it done. A wall plaque...Presto! But I wanted to find a way to incorporate the doilies that I used throughout my background. So I decided to use some craft foam to attach the large heart onto my background.


This allowed me to add bits and pieces behind the heart.


So, I used this area to tuck some cheese cloth and other goodies. I used a tag and some of the papers from my die cut assortment. I also used a mini clip to attach a tiny petal envelope that can be removed to read the hidden note.


I finished off my project by adding some text. Bless this love


I used a tiny cloth pin as a clip to hold my picture this allows me to change it out. I ended up making a scrapbook layout/picture holder. My intention was to create a wall plaque but it took a life of its own and I love it.


This was my attempt to Kill the mixed media kit. However, it's impossible to use it all up. I've created three projects and I still have lots of paint and other paper goodies that I can add to my stash. This kit has so much to play with that it's not easy to kill. But don't take my word for it. Get yourself a kit and play along!